Title: "IoT Energy Meter: Real-time Display and Remote Monitoring via Blynk App"
Overview:
In this project, our aim is to develop an IoT-powered Electricity Energy Meter using ESP32 and manage data via the Blynk Application. Earlier, we constructed IoT DC Energy Meters and GSM Prepaid Energy Meters. The traditional method of manually recording electricity consumption in meter rooms was laborious. However, IoT streamlines this process by automating remote data collection, saving both time and resources. The widespread acclaim for Smart Energy Meters has inspired us to create our own IoT-based Electricity Energy Meter.
An essential step involves selecting the right current and voltage sensors for precise power consumption measurement. The optimal choice for current measurement lies in the SCT-013, a Non-Invasive AC Current Sensor Split Core Type Clamp Meter, capable of measuring AC current up to 100 amperes. Similarly, the AC Voltage Sensor Module ZMPT101B emerges as the top-tier option, facilitating accurate AC voltage measurement using a voltage transformer.
Bill of Materials
Below, is the list of components necessary for constructing an IoT-based Smart Electricity Energy meter. You can order most of these components online from the following links.
| S.N. | Components | Quantity | |
|---|---|---|---|
| 1 | ESP32 WiFi Module | 1 | |
| 2 | ZMPT101B AC Voltage Sensor Module | 1 | |
| 3 | SCT-013-030 Non-invasive AC Current Sensor | 1 | |
| 4 | 20x4 I2C LCD Display | 1 | |
| 5 | Micro-USB Cable | 1 | |
| 6 | Resistor 10K | 2 | |
| 7 | Resistor 100ohm | 1 | |
| 8 | Capacitor 10uF | 1 | |
| 9 | Connecting Wires | 10 | |
| 10 | Breadboard | 1 |
SCT-013 Current Sensor

The SCT-013 serves as a Split Core Type Clamp Meter Sensor for measuring AC currents up to 100 amperes, operating non-invasively. These current transformers (CTs) excel in measuring alternating currents, making them particularly valuable for assessing overall building electricity consumption. Notably, the SCT-013 current sensors can be effortlessly clipped onto either the live or neutral wire, eliminating the necessity for complex high-voltage electrical tasks.

Specification
After Adding the above libraries to the Arduino IDE, you can upload the IoT Electricity Energy Meter Code ESP32 Board.
But before that please make changes to the WiFi SSID, Password & Blynk Authentication Token.
123char auth[] = "605c2d780fd*******d7a31611";char ssid[] = "*************************";char pass[] = "************************";
ZMPT101B AC Single Phase voltage sensor module

The ZMPT101B module, an AC Single Phase voltage sensor, operates on the high-precision ZMPT101B voltage Transformer, ensuring precise measurement of AC voltage. It serves as an optimal choice for accurately gauging AC voltage when connected to Arduino or ESP32.
This module accommodates voltage measurement within the 250V AC range, offering adaptable analog output. Additionally, its straightforward setup includes a multi-turn trim potentiometer, simplifying the process of calibrating and adjusting the ADC o
Specifications
- 1. Voltage up to 250 volts can be measured
- 2. Lightweight with on-board micro-precision voltage transformer
- 3. High precision on-board op-amp circuit
- 4. Operating temperature: 40ºC ~ +70ºC
- 5. Supply voltage: 5 volts to 30 volts
Circuit Diagram & Hardware Setup
Now let us see the circuit diagram of an IOT-based electricity Energy Meter using ESP32. The circuit has been designed using Fritzing software.

The setup is uncomplicated: both the SCT-013 Current Sensor and ZMPT101B Voltage Sensor connect their VCC to the ESP32's Vin, drawing power from its 5V Supply. Ground connections are established by linking the GND pins of both modules to the ESP32's GND. To interface with the ESP32, the ZMPT101B Voltage Sensor's output analog pin connects to GPIO35, while the SCT-013 Current Sensor's output analog pin links to GPIO34. Additionally, ensure the inclusion of two 10K resistors, a single 100-ohm resistor, and a 10uF Capacitor for the circuit.
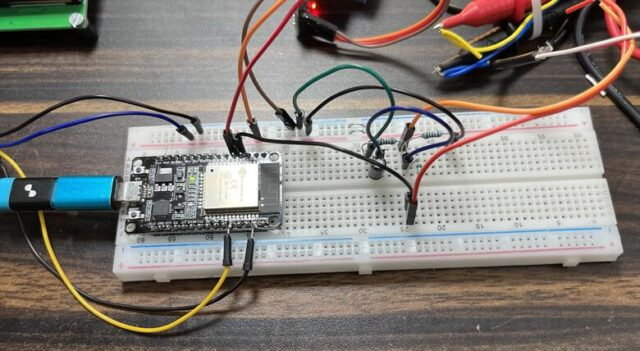
As for the physical wiring, the AC wires responsible for current and voltage measurements are to be linked to the input AC Terminal of the Voltage Sensor. The current sensor clip, on the other hand, does not require an external connection; simply place a single live or neutral wire inside the clip as demonstrated in the provided circuit diagram.".
Setting Up Blynk Application :
Blynk is an application that runs over Android and IOS devices to control any IoT-based application using Smartphones. It allows you to create your Graphical user interface for IoT applications. Here we will display the IoT Energy Meter Data on the Blynk Web Dashboard and also in mobile Application.
Visit Blynk.io and sign up using the email ID.
First Create a New Template.

Assign the name, Hardware, and Connection Type.

From the Web Dashboard, Create 4 widgets Gauge.

The 4 widgets are here to display the value of Vrms, Irms, Power & KWh. Do the settings as per the image below.

Finally, the Web Dashboard looks something like this and is ready to receive the Smart Energy Meter Data from ESP32.

Apart from the Web Dashboard, you can also set up your Mobile App Dashboard.
You can download and install the Blynk Application from the Google Play Store. IOS users can download from the App Store.
Once the installation is completed, open the app & sign up using your email ID and Password. Then set up the app similar to Web Dashboard.

- Required Library Installation
EmonLib Library
Obtain the EmonLib Library by downloading it using the provided link EmonLib Library is pivotal for the Electricity Energy Meter, enabling continuous monitoring by cyclically measuring voltage and current every 5 or 10 seconds. It diligently computes accurate average quantities for each measurement, allowing seamless background processing and utilization within the sketch.
Blynk Library
Blynk emerges as a leading Internet of Things platform, facilitating hardware connectivity to the cloud. It empowers users to create custom applications for hardware control and efficient management of deployed products at scale. With compatibility spanning over 400 hardware models, including Arduino, ESP8266, and ESP32, the Blynk Library ensures seamless integration with the Blynk Cloud.
Access the diverse capabilities of the Blynk Library by downloading it for compatibility with a wide range of hardware models.
"The ZMPT101B Voltage Sensor initially requires calibration as it arrives without pre-calibration. Utilizing an Arduino UNO/Nano Board proves beneficial for this task due to its accurate linear ADC pin. Employing the Arduino's analog pin A0 facilitates the sensor calibration process."

Source Code/Program – IoT Electricity Energy Meter
EmonLib Library
Obtain the EmonLib Library by downloading it using the provided link EmonLib Library is pivotal for the Electricity Energy Meter, enabling continuous monitoring by cyclically measuring voltage and current every 5 or 10 seconds. It diligently computes accurate average quantities for each measurement, allowing seamless background processing and utilization within the sketch.
Blynk Library Blynk emerges as a leading Internet of Things platform, facilitating hardware connectivity to the cloud. It empowers users to create custom applications for hardware control and efficient management of deployed products at scale. With compatibility spanning over 400 hardware models, including Arduino, ESP8266, and ESP32, the Blynk Library ensures seamless integration with the Blynk Cloud.
Access the diverse capabilities of the Blynk Library by downloading it for compatibility with a wide range of hardware models.
"The ZMPT101B Voltage Sensor initially requires calibration as it arrives without pre-calibration. Utilizing an Arduino UNO/Nano Board proves beneficial for this task due to its accurate linear ADC pin. Employing the Arduino's analog pin A0 facilitates the sensor calibration process."
Source Code/Program – IoT Electricity Energy Meter
After Adding the above libraries to the Arduino IDE, you can upload the IoT Electricity Energy Meter Code to the ESP32 Board.
But before that please make changes to the WiFi SSID, Password & Blynk Authentication Token.
1 2 3 | char auth[] = "605c2d780fd*******d7a31611"; char ssid[] = "*************************"; char pass[] = "************************"; |
The complete code is given below.


Source Code/Program – IoT Electricity Energy Meter Explanation
Libraries and Dependencies:
It includes necessary libraries such as EmonLib for energy monitoring, WiFi, Blynk, EEPROM for data storage, and a LiquidCrystal library for interfacing with an LCD display.
Calibration Constants:
Constants are defined for the calibration of voltage and current sensors.
Blynk and WiFi Configuration:
Blynk authentication token, WiFi credentials, and Blynk initialization are set up to connect the device to the Blynk platform.
Energy Monitoring Setup:
Initializes the EnergyMonitor library, sets up voltage and current inputs, and creates a timer for sending energy data to Blynk at regular intervals.
EEPROM Handling:
Manages EEPROM storage to retain energy data (voltage, current, power, and accumulated kWh) even during power outages.
Main Loop:
Runs the Blynk and timer functionalities continuously to send data to the Blynk platform.
Functions:
sendEnergyDataToBlynk():- Calculates energy consumption, updates values, saves data to EEPROM, and sends data to Blynk.
readEnergyDataFromEEPROM():- Reads stored kWh data from EEPROM and initializes if it's invalid.
saveEnergyDataToEEPROM():- Writes the current kWh value to EEPROM for data persistence.
This code essentially creates an IoT-connected energy meter that measures and transmits energy consumption data to Blynk for remote monitoring while ensuring data retention using EEPROM.


Testing ESP32 IoT Energy Meter Data on Blynk 2.0
The ESP32 Board will try connecting to the Wi-Fi network using the given SSID and password.
When no load is connected or when the load is powered off the Current and Voltage parameters should be almost 0. If it shows some other value, then you need to modify the following calibration factor in the code.

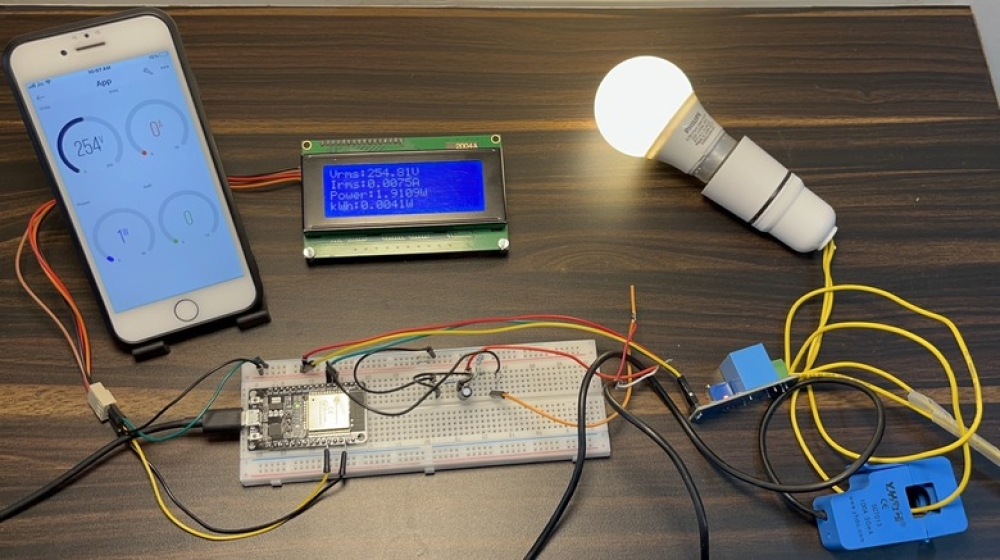
Now when the load is connected, the LCD Display will display the Voltage and Current value on the LCD Screen along with Power Consumption and total kWh units.
The energy meter data is uploaded to the Blynk Application after an interval of every 5 seconds. The data can be observed on the Blynk Web Dashboard.
Similarly, you can also observe the data on the Mobile Web Dashboard at the same time.

Thus, you can use this ESP32 IoT Energy Meter with Blynk 2.0 to monitor the electricity consumption of your house.

Conclusion:
In conclusion, the development of an IoT-based Smart Electricity Energy Meter using ESP32 and Blynk 2.0 will bring about a revolution in the monitoring and measurement of electricity consumption. The IoT-based solution eliminates manual meter readings, saving time and money.
With the use of the best current and voltage sensors, accurate readings of voltage, current, power, and total energy consumed can be obtained. The data can be accessed from any location through the Blynk 2.0 dashboard. In case of power outages, the energy meter data is stored in ESP32’s EEPROM, ensuring continuous readings.
This project presents an opportunity to automate electricity consumption monitoring and make it a more streamlined experience.
Comments
Post a Comment